TopHTML
Hyper Text Mark-Up Language
INTRODUCTION
HTML: Hypertext Mark-Up Language
HTML is the standard Language that web uses for creating and recognizing Hypermedia. HTML is widely praised for its ease of use. Web documents are typically written in HTML and named with the suffix .html. HTML documents are nothing more than standard 7-bit ASCII files with formatting codes that contains information about the :-
Layout,
Text-Styles,
Document Titles,
Paragraphs,
Lists and
Hyperlinks also.
HTML documents are platform independent i.e. it can be runnable on any terminal, on any web browser.
How to create HTML document?
Almost all documents on the web are in HTML format. HTML file can be created with any text editor like word pad or notepad with the suffix .html. We can execute HTML files on any web browser after its creation.. When anybody opens a first page of that document gets displayed. That page is known as the home page or the index page. It contains Logo of that organization to which this site belongs. Home page also displays a lot of other parameters and information.
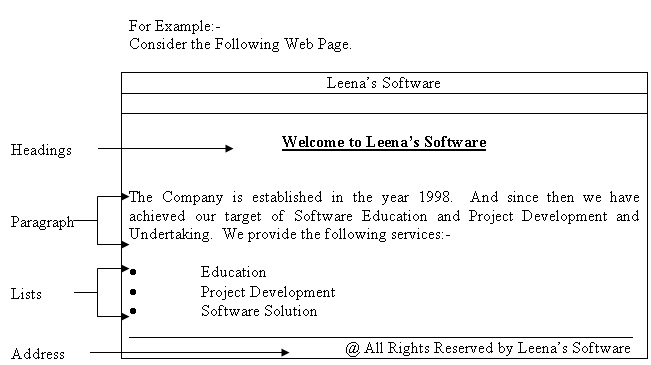
There are four basic elements of an HTML documents they are:-
1) Headings
Contains the heading of the page as “Welcome to My-Site” etc
2) Paragraphs
Contains actual information that the site owner wants to impart to viewer. There can be one or more paragraphs on each page of that document.
3) Lists
Contains key points which have links to actual information in that document.
4) Address
Contains address of the site owner i.e. organization or individual. It also has some links. Which helps the viewer to:-
1) Go to Home Page.
2) Execute Search Operation.
3) View Copy-right information.
For Example:-
Consider the Following Web Page.

HTML MARK-UPS
HTML mark-ups or tags are required
to be used in pairs. We need to specify
an opening tag at the beginning of the operation and a closing tag at the end
of the operation. Opening tag is
represented as < > while closing tag begins with </ and ends with
>.
For example:
For body section opening tag can
be represented as <BODY> and closing tag is represented as
</BODY>. In few cases closing tags
can be optional.
Basic Sections of an HTML Document.
HTML documents can be divided
into three basic sections:-
·
<HTML>
·
<HEAD>
·
<BODY>
Body tags:-
Boundaries of an HTML documents
are defined by HTML tags. <HTML> ,
</HTML>. The text scripts, images
etc are accommodated within these two tags.
For example:-
<HTML>
<HEAD>
<TITLE>MY
DOCUMENT</TITLE>
</HEAD>
Hey!! Welcome to the World of
HTML documents. This is the Body Section
of HTML document. There are some more
things to go……………
</BODY>
</HTML>
HEAD Tags:
Title for that document is
specified under Head section. The title
you specified appears in a heading area when document is viewed using a browser.
The TITLE name should be
meaningful and precise. It is important
because many times web-users mark the important sites using Book-marks. And the browsers use ‘title’ to store that
book-mark. Book-marking is followed
quite often by regular-net users.
Title also plays an important
role when user performs a ‘Search’ operation.
When a user executes a Search command with a keyword. Search operation displays the sites
containing the ‘keyword’ and also gives a one or two line description about
it. Title for the home page is generally
the name of the organization, or an individual who owns the site.
For example:-
<HTML>
<HEAD>
<TITLE> xyz
Limited</TITLE>
</HEAD>
<BODY>
Hey this is the Internet
Session…….
Welcome to xyz Limited..
- - - - - - - - - -- - - -
- - -- - - - - - - - -- -
</BODY>
</HTML>
It is used to present document META- information like information about the document
itself. It consist of META
tag.
For Example:
<META NAME = “Copyright”
CONTENT = “©: 1997”>
<META
NAME = “LastModified ” CONTENT = “Sandhya Chatarji”>
<META
NAME = “Color” CONTENT = “Red”>
Body Tags
You can enter text, Scripts,
Images etc. between two body tags, <BODY>, </BODY>
For example:-
<HTML>
<HEAD>
<TITLE> Body Section
</TITLE>
</HEAD>
<BODY>
- - - - - - - - - - - - - - - - -
- - - - - - - - -- - - - - - - - - - - - - - - - -
Hey this is the Internet
Session…….
Welcome to Leena’s Software
Education Services.
We are Learning what is the Body
Tag.
This Text is Written in the Body
Element of the HTML page.
- - - - - - - - - - - - - - - - -
- - - - - - - - -- - - - - - - - - - - - - - - - -
</BODY></HTML>
Address Element:
The <ADDRESS> element is
used to display the address and contact information of the owner. It is displayed at the end of the page and
may contain the following:
·
A Link to Home Page.
·
A Search String feature.
·
Copyright Information.
For Example:
<HTML>
<HEAD>
<TITLE> Address Element
</TITLE>
</HEAD>
<BODY>
- - - - - - - - - - - - - - - - -
- - - - - - - - -- - - - - - - - - - - - - - - - -
Hey this is the Internet
Session…….
Welcome to Leena’s Software
Education Services.
We are Learning what is the Body
Tag.
This Text is Written in the Body
Element of the HTML page.
The Address Element is used to
store Company Address etc.
- - - - - - - - - - - - - - - - -
- - - - - - - - -- - - - - - - - - - - - - - - - -
- - - - - - - - - - - - - - - - -
- - - - - - - - -- - - - - - - - - - - - - - - - -
<ADDRESS>
<P>
<A HREF =”some address”>
Click to register for a free newsletter</A>
</ADDRESS>
</BODY>
</HTML>
Div Element:
Division element divides the
document into sections. It consists
of<DIV> and </DIV> tags. It
has the ALIGN attribute. This element
only creates a line-break of a paragraph break.
Div Tag marks the logical division in the text. Physically there is no special effect of this
tag.
For Example:
<HTML>
<HEAD>
<TITLE> Div Element
</TITLE>
</HEAD>
<BODY>
<H1 ALIGN= “CENTER”>
INTERNET HELP</H1>
<HR>
<DIV ALIGN = “CENTER”>
<H2><I>Getting
Started with Internet Explorer. </I></H2>
Hey this is the Internet
Session…….
With an Internet Connection and
Internet Explorer, we can find and view information about anything on the
web.
<DIV ALIGN= “CENTER”>
<H2><I>Basic Set
Up</I></H2>
<DIV> If you are not
connected to the Internet or you want to create a new Connection then First
Establish an Internet Connection
</DIV>
</BODY>
</HTML>
Example
<HTML>
<HEAD>
<TITLE>Hello World!!
</TITLE>
</HEAD>
<BODY BGCOLOR =HOTPINK>
Hello World!!!!!!
Welcome to Sandhyashree Sports
Group………
The Sports Group At Thane
</BODY>
</HTML>
Example
<HTML>
<HEAD>
<TITLE>Welcome
</TITLE>
</HEAD>
<BODY BGCOLOR =PINK>
The Sports Group At Thane
<HR>
<BR>
High Friends!!!!!!
<P>Welcome to Sandhyashree
Sports Group………
The way to your success, is come
through the Sports only <BR> and Every Body should need this for life
prosperity.
<P>Hence come to us. We will certainly show you the way to success
and also the way to Fitness and Prosperity.
</BODY>
</HTML>
SOME HTML TAGS HTML Tags
Marquee Tag
<MARQUEE> tag is used for
scrolling the text across the web-page.
The effect of this tag is similar to scrolling Marquee Screen Saver in
Windows. To display text in a scrolling
format we can place it between the tags <MARQUEE> & </MARQUEE>.
For example:-
<MARQUEE>Good
Morning</MARQUEE>
Paragraph Tags
We have to specify HTML tags for
starting a new paragraph or to insert
carriage return in the HTML document.
“P” Tags
Pair of tags <P> and
</P> is used for compelling the text to begin from a new paragraph. The closing tag </P> is optional. Because when we specify opening tag <P>
to another text it starts from a new paragraph by default. For example:-
<P> This is the Paragraph
Beginning and the Paragraphs are the basics of each and every
language</P>
“BR” Tags
If user want a text start from a
next line <BR> tag can be used.
The text after <BR> tag begins from left margin of next line. For Example:-
<BR> The Line begins from
here.</BR>
Drawing a Line
We can draw a Horizontal Line by
<HR> tag. For Example
<HTML><HEAD>
<TITLE>My Computer
Ltd.</TITLE>
</HEAD><BODY>
<H1>Pace
Technology</H1>
<HR>
<P>The Technology plays a
vital role in the human lives. Without
latest technology the human life is meaningless and idle.
</P></BODY></HTML>
To adjust length of the line
“width=XX%” attribute is used. To adjust thickness of the line “size=X”
attribute is used. Line position can be
defined as ‘CENTER’, ‘LEFT’, ‘RIGHT’.
This can be done with align left/right/center attribute.
Enhancing Web Presentation
Tags can be used to change
physical as well as Logical styles of Web pages. This improves presentation of the site to a
great extent.
Headings
Headings are used to provide a
‘title’ in the body of the text. There
are altogether six levels of headings H1 to H6.
With a few browsers, there is a facility to define seventh heading
also. How ever use of all headings types
is not necessary. Only one headings
style can be also be defined. Headings
sizes can be used as:-
<H1>Sandhyashree Sports
Group </H1>
<H2>Sandhyashree Sports
Group </H2>
<H3>Sandhyashree Sports
Group </H3>
<H4>Sandhyashree Sports
Group </H4>
<H5>Sandhyashree Sports
Group </H5>
<H6>Sandhyashree Sports
Group </H6>
Tags can be summarized as:-
1)
Defining a
Heading
=<H1>
through <H6>
Attributes:
Align = Center à
Aligns heading to center.
Align =
Left à Aligns heading to
left.
Align =
Right à Aligns heading to
right.
2)
Drawing
Horizontal line
=<HR>
Attributes
Size =X (Thickness
of the line)
Width=XX% (Line width %
on Screen)
Align
=Center/Left/Right (Aligns
Line)
3)
Inserting a
carriage return
=<BR>,
</BR>
Attributes
<BR clear
=Left) Begins text from
left margin as soon as it is clear.
<BR
clear=Right) Begins text
form right margin as soon as it is clear,
4)
Preformatted
text
This is used
when we need the text to appear in HTML document same as that of its original
format.
=<PRE>,</PRE>
5)
Increasing or
Decreasing Font Size
=<FONT>,</FONT>
Attributes
Size = +1---
through +4 increasing the text/font size.
Size = -1--- through -4 decreasing the text font
size.
6)
Indenting
selected text as a paragraph
<BLOCKQUOTE>,</BLOCKQUOTE>
FONT STYLES, LISTS
HTML has tags that can be used to
format the document, which affects the way the text is displayed. These tags are grouped into two categories à
Physical Formatting and Logical Formatting.
1)
Physical
Formatting
Physical
formatting are those that define or alter characteristics of the text you put
tag on functions of same of the physical tags is as follows.
<B>,
</B> Bold
Text
<I>,
</I> Italics
text
<U>,
</U> Underlined
text
<TT>,
</TT> Tele
Typed text
<BIG>,
</BIG> Type
style is larger than the normal size.
<SMALL>,
</SMALL> Type style
is smaller than the normal size.
<STRIKE>,
</STRIKE> Displays a
Line through text.
<SUP>,
</SUP> Super
script text.
<SUB>,
</SUB> Sub
script text.
<CENTER>,
</ CENTER> Centers the
text.
<BLINK>,
</BLINK> Blinking
text.
<CENTER>,
</CENTER> Centered text.
2)
Logical
Formatting
Logical
formatting tags describe required effect of the text leaving rest everything up
to the browser. Browser used then
interprets these tags and displays the effect in its own way. Important difference between logical and
physical tag is:-
Physical tags
are interpreted equally by all browsers where as Logical tags differ from
browser to browser. Logical tags are:-
<EM>,
</EM> Emphasized
text.
<Strong>,
</ Strong > Bold face text.
<DFN>,
</DFN> Definated text.
<CODE>,
</CODE> Used for extracts of
program.
<KBD>,
</KBD> Used in Plain
format.
<VAR>,
</VAR> Used
for variables in program functions.
<CITE>,
</CITE> Used
for citation and references.
<DEL >, </DEL
<INS>,
</INS> Marks
inserted text.
< PERSONS
>, </PERSONS> Used for
marking person’s name.
< ACRONYM
>, </ACRONYM>Used for marking acronyms.
<ABBR>,
</ABBR> Marks
abbreviation.
Special Characters
The special characters including
symbols like less than ( < ), greater than ( > ) and so on can be printed
on HTML document. To produce these
symbols escape codes have to be used.
SYNTAX:
"e; 100(>) 50
"e;
The beginning of an escape code
is made with ampersand (&) and is ended with semicolon (;). Some escape codes are:-
Greater than ( > ) >
Less than ( < ) <
Quotes (“and”) "e;
Ampersand ( & ) &
Register trademark ®
Non-breaking-space
Title Attribute
Title Attribute provides basic
advisory information about the use of a particular element. In case of Anchors, title is useful since it
provides tool tip information for the link.
If a user holds the mouse over the link long enough, a tool tip is
displayed. It comes under the
<TITLE> AND </TITLE> tags.
For Example
<A HREF = “Sandhyashree.com”
TITLE = “Sandhyashree”>Sandhyashree </A>
mailto Element
You can make a users to send you
an Email, you can include a mailto element in to your WEB page. For Example
<A HREF = mailto:sandhya@mymail.com>
Lists
HTML contains various types for
describing the multiple types of lists.
Document can contain one type of listing or multiple types of
listing. They can be accommodated in a
single HTML document. Types of lists
are:-
1)
Unordered
List
Contains items
which are bulleted in a simple style in either a single or multiple columns.
2)
Ordered
List:
Called as
numbered lists. They have items which
are numbered automatically.
3)
Definition
List:
Contains lists
of terms and their related definitions.
Unordered Lists
Is the simplest type of list
among all. It precedes bullets to each of the item in the list. Type of bullet to be used is selected by
using attributes with unordered list tag.
Tags used for representing unordered list are <UL>, <LI>.
<UL> refers to unordered list.
<LI> refers to list
items.
Create an Unordered List with
following Steps:-
1)
Begin <UL> tag.
2)
Follow <UL> tag with the name with which list to
be identified.
3)
Enter each item, to be displayed in that list, preceded
by a <LI> tag.
4)
After finishing inserting all the items mark end of
list with </UL> tag.
For Example
<UL> List Heading
<LI> No1
<LI> No2
<LI> No3
</UL>
We can use different list
attributes to define shape of the bullets.
We also can have an attribute to format text with no bullets. Various attributes and their functions are:-
Attribute à
Bulleted.
List Tag
<UL>, </UL>
Attribute à
Customize Bullets.
List Tag
<LI Type =Square> Square Bullets.
<LI Type =Disk> Sphere Bullets.
<LI Type =Circle> Round Bullets.
Ordered Lists
Ordered Lists replaces <UL>
tag in the Unordered List with <OL> tag.
<OL> tag has a function similar to <UL> tag. Numbers as they appear in an HTML document
can be customized using different attributes.
We can customize an ordered list to display numbers in “Upper-Case” or
“Lower-Case” “Roman” or “Arabic” numbers.
Or use alphabets as a, b, c. ….. instead of using 1, 2, 3 . . .
To create ordered list following
steps can be used.
1)
Begin <OL> tag.
2)
Follow <OL> tag with the name with which list to
be identified.
3)
Enter each item, to be displayed in that list, preceded
by a <LI> tag.
4)
After finishing inserting all the items mark end of
list with </OL> tag.
For Example
<OL> List Heading
<LI> No1
<LI> No2
<LI> No3
</OL>
Different list attributes can be
used to define numbering system they are:-
Attribute: Upper Roman
List tag =<LI Type = I >
Attribute: Lower Roman
List tag =<LI Type = i >
Attribute: Capital Letters
List tag =<LI Type = A >
Attribute: Small Letters
List tag =<LI Type = a >
Attribute: Beginning
Numbers with other digit that ‘1’
List tag =<LI Start = N >
Definition Lists
Definition Lists are used for creating
a list of terms and their definitions.
Glossary of various terms can be the best example of contents for this
list.
1)
To specify heading for the terms and definitions to
follow use <DL> tag.
2)
To specify terms use<DT> tag
3)
To define its definition use<DD> tag.
For example
<DL> Heading
<DT> Term
1
<DD>
Definition of Term 1
<DT> Term
2
<DD>
Definition of Term 2
<DT> Term
3
<DD>
Definition of Term 3
</DL>
TABLES AND HYPERLINKS
Tables
In HTML documents we can create a
table and table data. The tag used for
table is:-
<TABLE>, </TABLE>
To specify the table border we
can use BORDER attribute. Columns and
width of the table can be specified with cols and width attribute.
For example:
<TABLE BORDER= 1 COLS = 2
WIDTH = “50%”>
A Row to a table can be inserted
with the <TR> tag and ends with the </TR> tag. Cell contents can be specified with the
<TD> tag and ends with the </TD> tag.
For example:
<TR>
<TD> Name
<TD> Age
</TR>
<TR>
<TD>Seema
<TD>30
</TR>
To describes the contents of the table
<CAPTION> and </ CAPTION> tags are used.
For example:
<CAPTION>Student
Details</CAPTION>
The table heading can be given by
<TH> and </TH> tags. It
creates the Heading Cells.
For example:
<TH>Name</TH>
<TH>Age</TH>
<TH>Salary</TH>
<TH>Address</TH>
To disable default word wrapping
of cell text use NOWRAP is used in a Table Cell either with <TD> or with
<TH> tags. This guarantees the
text to be displayed on one Line.
For example:
<TH NOWRAP>Names of the
Countries</TH>
<TD NOWRAP>The United States of America
To Merge the cells content with
another cell <COLSPAN> attribute can be used. And to merge the Rows into one another the
<ROWSPAN> attribute is used.
ROWPAN
<HTML>
<HEAD>
<TITLE>Table Attributes
</TITLE>
</HEAD>
<BODY>
<TABLE border=1>
<CAPTION>RowSpan Example
</CAPTION>
<TR>
<TD ROWSPAN =2>Cell No 1
<TD>Cell No 2
<TD>Cell No 3
</TR>
</TABLE>
</BODY>
</HTML>
COLSPAN
<HTML>
<HEAD>
<TITLE>Table Attributes
</TITLE>
</HEAD>
<BODY>
<TABLE border=1>
<CAPTION>ColSpan Example
</CAPTION>
<TR>
<TD COLSPAN =2>Cell No 1
<TD>Cell No 2
<TD>Cell No 3
<TD>Cell No 4
</TR>
</TABLE>
</BODY>
</HTML>
The horizontal alignment (ALIGN)
and vertical alignment (VALIGN) attributes are put to use to control alignments
within a table cell.
The Align attributes are: LEFT,
CENTER, RIGHT, and AND JUSTIFY.
The VALIGN attributes are: TOP,
MIDDLE, BOTTOM, and BASELINE.
The Cell Spacing attribute is
used to create more space between each cell in the table.
Syntax:
<Table Cellspacing = “2”>
The Cell Padding is used to increase
the amount of space between the cell border and the cell data.
Syntax:
<Table Cellpadding = “5”>
For Example:
<HTML>
<HEAD>
<TITLE>Table Attributes
</TITLE>
</HEAD>
<BODY>
<TABLE border=2 cellPadding=
5 cellSpacing = 5>
<CAPTION>Cell Spacing and
Padding
</CAPTION>
<TR>
<TH >Country
<TH>Capital
<TH>Currency</TH>
</TR>
<TR>
<TD>India
<TD>Delhi
<TD>Rupee
</TR>
<TD>USA
<TD>Paris
<TD>Doller
</TR></TABLE>
</BODY></HTML>
Hyperlinks
Basically HTML documents is the
linked documents. That means these documents
having the links to some other documents.
That can be created with <HREF> tag. A Hyperlink can be attached to the text or to
an image.
For example
Abc.html
<HTML><HEAD>
<TITLE>ABC
FILE</TITLE>
</HEAD>
<BODY BGCOLOR=”hotpink”>
<H1>WELCOME TO ABC
CORPORATION</H1>
<P> This is page is linked
into Main Document.</p>
<P> Creating a Link is a
opening an existing HTML File into another file.</P>
</BODY>
</HEAD></HTML>
XYZ.html
<HTML>
<HEAD>
<TITLE>XYZ
Limited</TITLE>
</HEAD>
<BODY BGCOLOR= “Gray”>
<H1>WELCOME TO XYZ India
Ltd.</H1>
<P> This is page is linked
into Main Document.</p>
<P>Welcome.</P>
<P>Welcome and Good Day to
All</P>
</BODY></HEAD>
</HTML>
Main.html
<HTML><HEAD>
<TITLE>Using Links in Main </TITLE>
</HEAD>
<BODY BGCOLOR= “light yellow”>
<H1> Welcome to My Home
Page Friends</H1>
<HR>
<A HREF = “Abc.Html”>Clik
me</A>
<A HREF = “XYZ.Html” img src= “deep.bmp”></A>
<HR></BODY>
</HEAD></HTML>
Link Color
The LINK element used to specify
the relationship between links. This
element is defined in the HEAD section.
The relationship is defined using REL and REV attributes. The REL attribute describes a “Forward” link
while REV attribute describes a “Reverse link.
Relation.html
<HTML><HEAD>
<TITLE>Relations</TITLE>
<LINK rel= “Abc” HREF= “Abc.html”>
<LINK rev= “XYZ” HREF=
“Xyz.html”>
</HEAD>
<BODY BGCOLOR= “light yellow”>
<P>
<FONT COLOR = “Forestgreen”
Face = “Arial”>Creating forward and Reverse Links
</BODY>
</HEAD></HTML>
LINK
The default color is blue for a
LINK element so do not change the default color of the link the other color may
confusing. The other attributes of link
elements are:
ALINK
ALINK Stands for active
link. When the user clicks the link the
color of the link changes.
VLINK
Stands for visited link. The default color of the visited link is pink
but choice may of the users.
Main.html
<HTML>
<HEAD><TITLE>Using
Link Colors</TITLE>
</HEAD>
<BODY LINK = blue ALINK =
hotpink VLINK = green>
<H1> <CENTER>Creating
Links</CENTER></H1>
<BR><BR>
<P>The Main Document.
<A HREF = “Abc.Html”>Clik
me</A>
<BR><A HREF = “XYZ.Html” img src= “deep.bmp”></A>
<HR></BODY>
</HEAD></HTML>
Images as Hyper Links
Inline images can be used as
hyperlinks just like a plain text.
For Example:
<A HREF =
“Abc.html”><IMG SRC = “UnderConstruction.gif” ALT =
“[Underconstruction]”></A>
Image Mapping
An Image map is the active
geometric regions called as Hotspots.
When the user clicks on a hot spot the link is activated. The co-ordinates of the hot spots are
determined using geometric shapes.
Shapes and co-ordinates of the hotspot area has to be specified.
Shapes Description
Default Specifies entire region. This is the
default.
Rect Specifies a Rectangular region.
Circle Specifies the Circular region.
Poly Specifies the Polygonal region.
Co-ordinates Combination
Rect Left x, Top y, Right x, Bottom y.
Circle Center x, Center y, Radius.
Poly X1, Y1, X2, Y2……..Xn, Yn.
For Example:
<HTML><BODY>
<A id –“ImageLink” HREF = “ ”
>
<CENTER>
<IMG SRC =
“E:\SANDHYA\IMAGES\DEEP.GIF WIDTH =200 HEIGHT =190 BORDER =1 usemap =
“#map1”>
</A></CENTER>
<MAP name = “map1”>
<AREA href = “File1.html” alt
= “ Contents” Shape = “rect” coords = “0,0,80,80”>
<AREA href = “File3.html” alt
= “ Back” Shape = “circle” coords = “163,175,60”>
<AREA href = “File4.html” alt
= “ Order” Shape = “poly” coords = “163,0,175,28,50,50,163,0”>
</MAP>
</BODY></HTML>
BASIC FORM ELEMENTS
We can enhance the HTML documents
by certain form methods/ objects. The
various form objects are as follows:-
1)
Text
Field:
We can Accept
or enter the text in the user defined text field. Text box on the document can be drawn by
<INPUT TYPE = “text”>
2)
Password
Field
This is the
same as text box field except that the text entered in this field is decoded to
unreadable character tat is (*). The
Password field can be drawn as <INPUT TYPE = “password”>
3)
Button
The command
buttons are the for most usable object on any of the GUI application. We can create buttons on the form and
associate them with certain events.
Buttons can be drawn by <INPUT TYPE = “button”>
4)
Submit
This is the
same as command button the difference between this and command button is that
the form is submitted for further action with this button. The Submit buttons can be drawn by <INPUT
TYPE = “submit”>
5)
Reset
This is used
with the association of submit button.
It is also a type of command button.
It can drawn by <INPUT TYPE = “reset”>
6)
Radio
button
We can create
an option buttons on the HTML Document.
An option buttons are also known as Radio Button. It can be drawn on the form by <INPUT TYPE
= “radio”>
7)
Checkbox
We can create a
check box on the HTML document. Check
Box can be drawn by <INPUT TYPE = “checkbox”>
8)
Text Area
The large
amount of data can be entered using text area option. The text area can be
drawn by <INPUT TYPE = “textarea”>
For Example:
<HTML>
<HEAD>
<TITLE>Form
Processing</TITLE>
<BODY>
<H2 ALIGN = “CENTER”>
Basic Form Processing<H2>
<HR>
<FORM NAME = “myForm1”>
Your Name
<BR>
<INPUT TYPE = “Text” Name =
“Text1” Size= “15”>
<BR>
Your Password
<INPUT TYPE = “password” Name
= “pass1” Size= “8”>
<BR>
<INPUT TYPE = “Button” Name =
“But1” Value= “Click Me”>
<BR>
</FORM>
</BODY>
</HTML>
ATTRIBUTES
Text Box Attributes
Text box can be added on the form
or HTML document by Input Type =Text Box.
The other attributes are:-
Name
The name property of the text box
can be used within a input type tag.
Text name property is used to indicate the text box’s name.
Size
We should use this property to
indicate the width of the text box. Thus
text box has the name and the size attributes.
Password Attributes
Password field can be taken as
input type = password. It has the same
attributes as text box.
Name
Describes the name property of the
Password Field.
Size
Describes the width of the
password field.
Button Attributes
Button or command button are used
to give certain commands. It is accepted
on the form by Input type = “Button”.
The other attributes of the buttons are:
Name
Describes the name property of
the command button.
Value
Describes the caption property of
the command button.
Check Box Attributes
Are to be used when there are
multiple choice are given. It is taken
on the form by Input type = “check box”.
The other attributes of the check boxes are:
Name
Describes the name property of
the check box.
Value
Describes the caption property of
the check box.
Checked
Checked is the default selection
while form is loading. We can make
certain choices to be checked while loading the form.
Radio Button Attributes
Radio buttons are to be used when
only one of the given selections is to be clicked. It can be created on the form by Input type
= “radio”. The other attributes of the radio buttons
are:
Name
Describes the name property of
the radio buttons.
Value
Describes the caption property of
the radio buttons.
Checked
Checked is the default selection
while form is loading. That means we
have to make one of the radio buttons to be checked before executing on the
browser.
Text Area Attributes
When we need to accept the value
that is larger than normal text field then text area can be used. It can be accepted as:-<TEXT AREA>,
</TEXT AREA> tags. The other attributes
of the text area are:-
Rows
The number of the lines for text
area for example Rows =”5”
Cols
The number of characters that can
be accepted in text area. For example
Cols = “40”
For Example
<HTML>
<HEAD>
<TITLE>Students Form
</TITLE></HEAD>
<BODY>
<H2 ALIGN = “CENTER”>
Students Form
Processing</H2>
<HR>
<FORM NAME = “myForm1”>
Name :
<BR>
<INPUT TYPE = “Text” Name =
“Text1” Size= “15”>
<BR>
Password :
<BR>
<INPUT TYPE = “password” Name
= “pass1” Size= “8”>
<BR>
Roll No :
<BR>
<INPUT TYPE = “Text” Name =
“Text2” Size= “4”>
<BR>
Address :
<BR>
<Text Area Name = “Address”
Rows = “4” Cols = “30” </TextArea>
<BR>
Hobbies :
<INPUT TYPE = “checkbox” Name
= “check1” value= “Reading” Checked>Reading
<INPUT TYPE = “checkbox” Name = “check2” value= “Music”>Reading
<INPUT TYPE = “checkbox” Name = “check3” value = “Trekking”>Trekking.
<INPUT TYPE = “checkbox” Name = “check2” value= “Music”>
<INPUT TYPE = “checkbox” Name = “check3” value = “Trekking”>Trekking.
<BR>
<BR>
<INPUT TYPE = “radio” Name =
“radio1” value= “Male” Checked>Male
<INPUT TYPE = “radio” Name =
“radio2” value= “Female” >Female
<BR>
<BR>
<BR>
</FORM>
</HTML>
SOME MORE CONTROLS
Pull Down Menus(Combo Box)
The pull down menu component used
to select an item form a list of items given.
The drop down menu is used when one item is to be selected from a large
list.
For example:
<HTML>
<HEAD>
<TITLE>Trying Combo
Box</TITLE>
</HEAD>
<BODY>
<H2 ALIGN = “CENTER”>
<I>Select Option From
Following Combo Box</I></H2>
<HR>
<BR>
<P ALIGN = “LEFT”> SELECT
OPTION</P>
<P ALIGN = “CENTER”>
<SELECT Name = “Menu1”>
<OPTION VALUE = “R”>RED
<OPTION VALUE = “G”>GREEN
<OPTION VALUE = “B”>BLUE
<OPTION VALUE = “Y”>YELLOW
<OPTION VALUE = “O”>ORANGE
<OPTION VALUE = “P”>PURPLE
<OPTION VALUE = “H”>HOT
PINK
</SELECT></P>
</BODY>
</HTML>
Pull Down Menu Properties:
<SELECT>, </SELECT>
tags are used to specify the pull down menu option.
Name
The name property for pull down
menu indicates the name of the combo box (pull down Menu)
Option Value
Each option’s values are to be
given separately in separate tags.
Frames
Frames enable the user to divide
a page into number of rectangular regions/windows of various sizes. Hence a frame is a window within another
window. Thus a page can have one or more
frames. The frames can divide the page
so that each of the frames is a web page in itself. That is they can access different URLs and
each of these can be update independently.
Frameset is the HTML tag used to
create a framed page. The frameset tag
can have two attributes that is Rows and Columns.
Rows
Rows specify number of horizontal
windows or frames and values in the rows attribute specifies height of the
frames in frameset.
Cols
Specify number of vertical
windows or frames and values in them specify width of frames in frameset.
Example Frames Creation (Vertical Frames)
<HTML>
<HEAD>
<TITLE>Frames</TITLE></HEAD>
<FRAMESET COLS =30%,70%>
<FRAME SRC =”A1.HTM” NAME
=”FIRST FRAME”>
<FRAME SRC =”A2.HTM” NAME
=”SECOND FRAME”>
</FRAMESET>
</HTML>
A1.HTML
<HTML>
<BODY BGCOLOR =GRAY>
<P>Frame A</P>
</BODY></HTML>
A2.HTML
<HTML><BODY BGCOLOR
=BLUE>
<P>Frame B </P>
</BODY></HTML>
<HTML><HEAD>
<TITLE>Frames</TITLE>
</HEAD>
<FRAMESET COLS =30%,70%>
<FRAME SRC =”A1.HTM” NAME
=”FIRST FRAME”>
<FRAMESET ROWS=30%,70%>
<FRAME SRC =”A2.HTM” NAME
=”SECOND FRAME”>
<FRAME SRC =”A3.HTM” NAME
=”FRAME NO 3”>
</FRAMESET></HTML>
A3.HTML
<HTML>
<BODY BGCOLOR =YELLOW>
<P>Frame C </P>
</BODY></HTML>